Getting Started
Let’s walk through how to get started — no tech wizardry required. Just a few simple steps to create your account, log in, and set up your profile so everything feels just right for youCreate Account
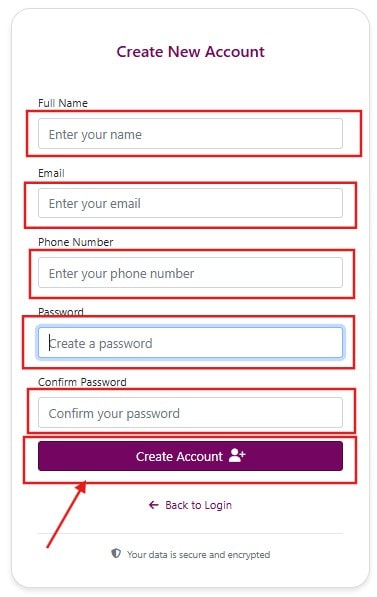
To create your account on Laundry Grow, follow the steps below:
- Visit https://account.laundrygrow.com/login/ and click on the "Create New Account" button.
- Enter your Full Name, Email ID, Phone Number, Password, and Confirm Password.
- After filling out the form, click on the "Create Account" button.
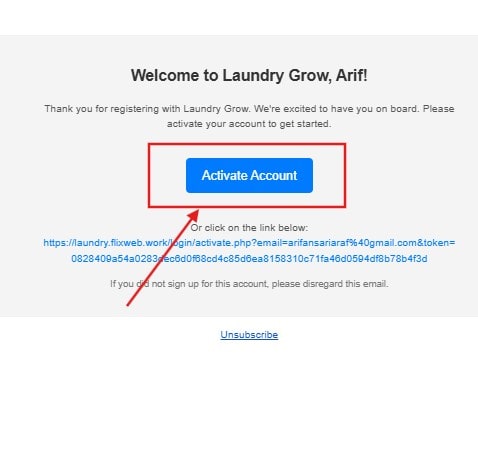
- You will see a success message and also receive a confirmation email at your registered email address.
- Open the email and click on the "Activate" button to verify your account.
- Once verified, go to the Login page and sign in to your account.
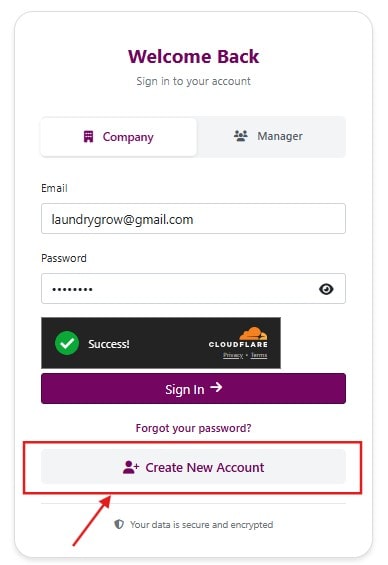
Login
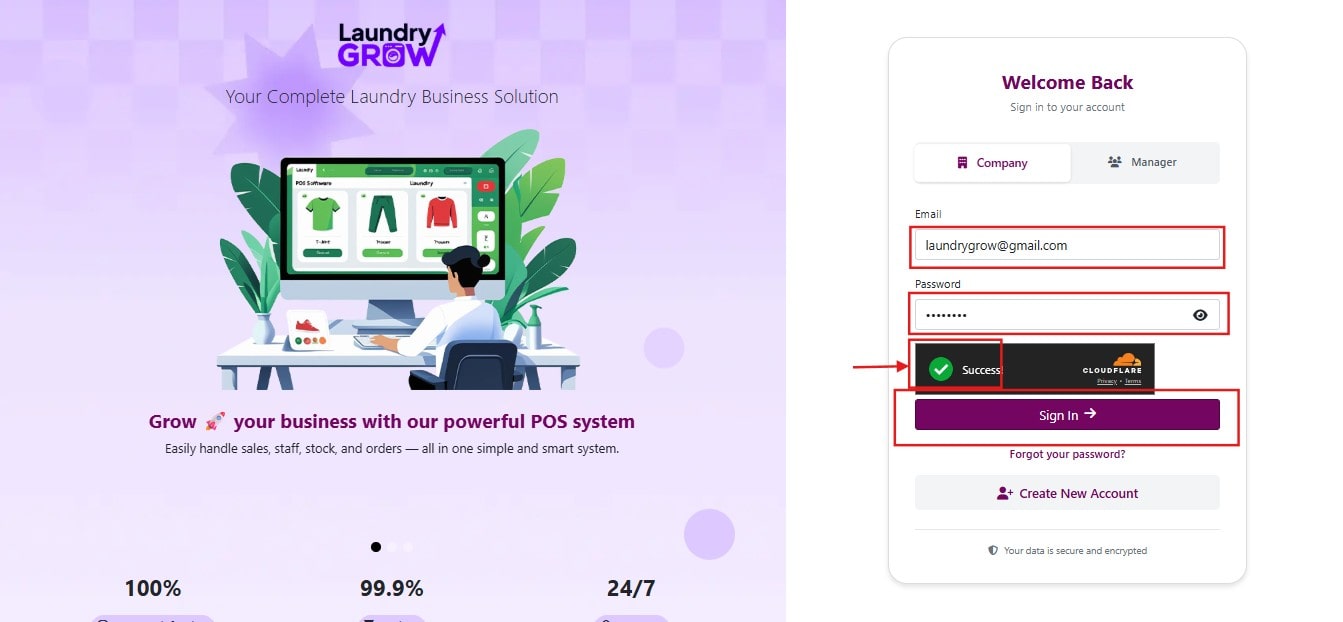
To log in to your Laundry Grow account, follow the steps below:
- Go to the https://account.laundrygrow.com/login/ page.
- Enter your registered Email ID and Password.
- The captcha will be automatically verified with a green checkmark. If not, complete the captcha manually.
- Click on the "Sign In" button.
- Once logged in, you will be redirected to your Laundry Grow Company Setup Page (see Account Configuration).
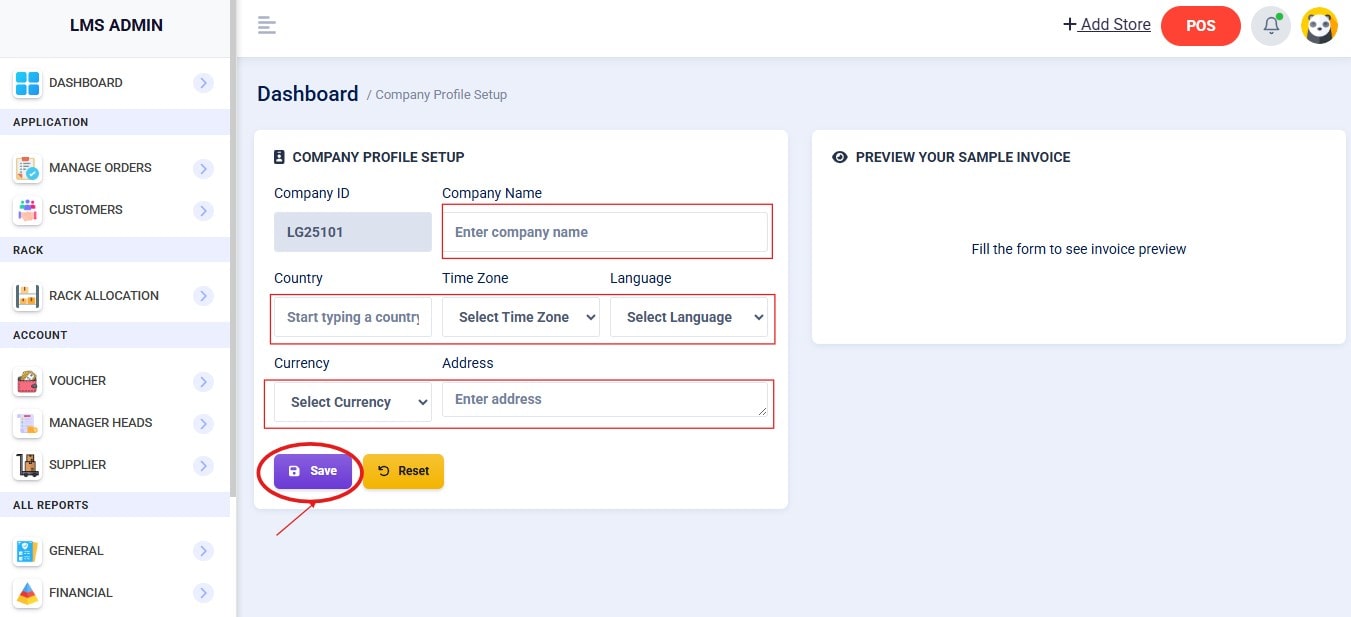
Account Configuration
To configure your company Profile, follow the steps below:
- Fill in the form with the required company details.
- Click on the "Save" button.
- A success message will appear, and you will be redirected to the dashboard.
Point of Service (POS)
Learn how to use the Point of Sale (POS) feature in Laundry Grow for quick and easy billing.
Create New/Existing Customer
To add New/Existing Customer, follow the steps below:
- Click on the "POS" button from the top-right navigation bar to access the POS.
- When you enter the POS, a popup will appear with two options: "New Customer" and "Existing Customer".
- If the customer already exists in the system, click on "Existing Customer" and search/select the customer from the list (see Search Customers).
- If the customer is new, click on "New Customer" and fill in the required details to create the customer profile (see Add New Customer).
- Once the customer is selected, you will be redirected to the POS screen where you can add products, generate bills, and complete the transaction.
Add to Cart
To add products to the cart, follow the steps below:
- After selecting the customer (see Create New/Existing Customer), click on the desired product.
- A popup will appear where you need to enter the quantity.
- Click on the "Submit" button to confirm.
- The product will be added to the cart, and you can see it listed in the cart section.
- Repeat the same process to add more products to the cart.
Add Upcharge
To add an upcharge to your product, follow the steps below:
- Go to the cart section where your selected products are listed (see Add to Cart).
- On the top-right corner of a product, click on the icon to manage upcharges.
- A popup will appear showing all the individual item details.
- In the popup, fill out the form with the required upcharge details.
- Click on the "Save" button to confirm.
- You will see a success message, and the upcharge will be added to your cart.
Update Quantity
To update the quantity of your product, follow the steps below:
- Go to the cart section where your selected products are listed (see Add to Cart).
- On the bottom-left corner of a product, click on the Edit icon.
- A popup will appear where you can enter the new quantity.
- Click on the "Update to Cart" button to save the changes.
- The cart will refresh, and the updated quantity will be reflected successfully.
Update Item Price
To update the item price of your product, follow the steps below:
- Go to the cart section where your selected products are listed (see Add to Cart).
- Below the product name, you will see the product price. Click on the price field to edit it.
- Enter the new price and click on the "Save Changes" button.
- The cart will refresh, and the updated price will be applied successfully.
Confirm Order
To confirm your order, follow the steps below:
- Go to the cart section where your selected products are listed (see Add to Cart).
- Below the cart section, click on the "Confirm Order" button.
- A popup will appear where you need to select the following:
- Collect Method – Choose between Collect at Store or Deliver to Address.
- Delivery Date – Select the preferred delivery date.
- Payment Type – Choose from Full, Advance, or None.
- If you select Full, the amount will be fixed and cannot be edited.
- If you select Advance, you will need to enter the advance amount.
- If you select None, no amount entry is required.
- Payment Mode – This option appears only if you choose Full or Advance. Select the mode of payment (e.g., Cash, Card, UPI, Bank).
- Discount – Apply a discount if available.
- After filling out the details, click on "Next".
- If the Collect Method is Collect at Store, clicking Next will directly take you to confirm the order.
- If the Collect Method is Deliver to Address, you will be asked to provide the delivery address. Enter the details, then click on "Save and Confirm Order".
- Once the order is successfully placed, you will see options to:
Manage Orders
Guide on how to manage orders with Laundry Grow for smooth operations.
Search Orders
To search orders, follow the steps below:
- Go to the Manage Orders section. Here, you will see the list of all orders.
In the filter section, you can:
- Click on the Scan button. Your browser will ask for camera permission — grant the permission, then scan the invoice QR code to quickly access the order.
- Search by Order Number or Customer Name.
- Filter orders by Date Range (From – To).
- Filter by Order Status (e.g., Pending, Processing, Ready to Deliver, Delivered).
- Filter by Payment Type (Full, Advance, None).
View Orders
To view order details, follow the steps below:
- Go to the Manage Orders section. A list of all orders will be displayed.
- Find the order you want to view and look at the Action column in the orders table.
- Click the Action dropdown button for that order.
- Select "View Order" from the dropdown menu.
- You will be redirected to the Order Details page.
- On the Order Details page, you can view:
- Customer Information – Name, contact details, and address.
- Products – Items in the order with quantities, prices, and any upcharges.
- Payment Details – Type, mode of payment, and applied discounts.
- Order Status – Current status along with delivery or collection details.
- Additional Actions – Print the invoice, send via WhatsApp, or request feedback, Cancel order, Refund, Status, etc.
Print Invoice
To print an invoice for an order, follow the steps below:
- Go to the Manage Orders section and locate the order for which you want to print the invoice.
- In the Action column of the order, click on the Action dropdown button.
- Select "Print Invoice" from the dropdown menu. A print preview will open automatically.
- Review the invoice in the print preview, then choose your printer settings.
- Click "Print" to print the invoice.
- If supported by your browser or printer settings, you can also save the invoice as a PDF for digital records.
Change Order Status
To change status of an order , follow the steps below:
- Go to the Manage Orders section and locate the order for which you want to update the status.
- In the Action column of the order, click on the Action dropdown button.
- Select "Change Order Status" from the dropdown menu. A popup will appear.
- In the popup, you will see a dropdown list with the following options:
- Pending
- Processing
- Ready to Deliver
- Delivered
- Select the desired status from the dropdown.
- Click on the "Update" button.
- Your order status will be updated successfully, and the change will be reflected in the orders list.
Cancel Order
To cancel an order, follow the steps below:
- Go to the Manage Orders section and locate the order you want to cancel.
- In the Action column of the order, click on the Action dropdown button.
- Select "Cancel Order" from the dropdown menu. A popup will appear.
- In the popup, you will be asked to provide a reason for cancelling the order.
- Enter the reason in the given field.
- Click on the "Confirm" button.
- The order will be cancelled successfully, and the status will be updated in the orders list.
Refund Order
To refund an order amount, follow the steps below:
- Go to the Manage Orders section and locate the order you want to refund.
- In the Action column of the order, click on the Action dropdown button.
(The Refund Order option will only appear if the order has already been canceled.) - Select "Refund Order" from the dropdown menu. A popup will appear.
- Enter the refund amount and choose the payment method (e.g., Cash, UPI, Card, Bank).
- Click the Refund button. The refund will be processed successfully, and the customer will receive the amount.
Send Order Details via WhatsApp
To send the order details via WhatsApp, follow the steps below:
- Go to the Manage Orders section and locate the order you want to share.
- In the Action column of the order, click on the Action dropdown button.
- Select "View Order". You will be redirected to the Order Details page.
- On the top-right corner of the page, click on the "Send" button.
- A popup will appear with a WhatsApp number field. (The customer’s registered phone number will be auto-filled.)
- Click on the "Send Invoice" button to send the order details via WhatsApp.
- You will see a success message confirming that the order details were sent successfully.
Send Feedback Request
To send a feedback request to your customer, follow the steps below:
- Go to the Manage Orders section and locate the order for which you want to request feedback.
- In the Action column of the order, click on the Action dropdown button.
- Select "View Order". You will be redirected to the Order Details page.
- On the top-right corner of the page, click on the "Feedback Request" button.
- A popup will appear with the customer’s WhatsApp number auto-filled in the field.
- You will also see a list of feedback links and social media links. Select the link(s) you want to send to the customer.
- Click on the "Send WhatsApp Message" button to send the feedback request.
- A success message will confirm that the feedback request has been sent successfully.
Assign Rack
To assign an order to a rack, follow the steps below:
- Go to the Manage Orders section and locate the order you want to assign to a rack.
- In the orders table, check the box in the first column for the order you want to assign.
- Once selected, you will see the "Assign Rack" button appear at the top-right corner of the table.
(If you select multiple orders, the button will change to "Assign Bulk Rack"). - A popup will open showing the rack and shelf interface.
- Select the desired shelf and click on the "Assign" button.
- The order(s) will be successfully assigned to the chosen rack, and a confirmation message will appear.
Print Label
To print a label for an order, follow the steps below:
- Go to the Manage Orders section and find the order you want to print a label for.
- In the orders table, select the checkbox in the first column for that order.
- After selecting, the "Print Label" button will appear at the top-right corner of the table.
- Click on the button, and a popup will open with print settings where you can customize options such as paper size, page orientation, labels per row, margins, etc.
- Click on "Continue to Preview" to see the label preview.
- Finally, click on the "Generate PDF" button, and your label will be ready for printing.
Partial Delivery
To update an order for partial delivery, follow the steps below:
- Go to the Manage Orders section and find the order you want to update.
- In the Action column of the order, click on the Action dropdown button.
- Select "Change Order Status" from the dropdown menu. A popup will appear.
- In the popup, choose the "Delivered" option. Another popup will open showing all items in that order.
- Select the items you want to deliver by checking the corresponding checkboxes.
- Click on the "Confirm Delivery" button to mark the selected items as delivered.
- Your order status will be updated successfully, and the changes will be reflected in the orders list.
Manage Customers
Learn how to manage customers in Laundry Grow with ease.
Search Customers
To search for customers, follow the steps below:
- Go to the Customers section. You will see a list of all customers.
- Use the filter section to refine your search. You can:
- Search by Customer Name, Phone Number, or Email.
- Filter by Customer Type – choose between Regular or Business customers.
Add New Customer
To add a new customer, follow the steps below:
- Go to the Customers section. You will see a list of all existing customers.
- Click on the "New Customer" button located at the top-right corner of the customer list table. A popup form will appear.
- In the popup form, first select the Customer Type – either Business or Regular.
- Fill in the other required customer details (such as Name, Email, Phone Number, Address, etc.).
- Click the "Save" button. The new customer will be added successfully, and a confirmation message will appear.
Edit Customer
To edit an existing customer’s details, follow the steps below:
- Go to the Customers section. You will see a list of all existing customers.
- In the Action column of the customer table, click on the Action dropdown button for the customer you want to edit.
- Select "Edit Customer" from the dropdown menu. A popup form will appear with the customer’s existing details pre-filled.
- Make the necessary changes to the customer’s information.
- Click on the "Update" button. The customer’s details will be successfully updated, and a confirmation message will appear.
Manage Custom Price List
To manage a custom price list for a customer, follow the steps below:
- Go to the Customers section. You will see a list of all existing customers.
- In the Action column of the customer table, click on the Action dropdown button for the customer you want to manage.
- Select "Manage Price List" from the dropdown menu. A popup will appear showing the customer’s custom price list.
- Click on the "Set Price" button. Another popup will open displaying all items with their current prices.
- Select an item from the list and enter the new price you want to customize for that customer.
- Click on the "Save Price" button. The custom price will be added for that customer and displayed in the price list.
- From the list, you can also:
- Edit a custom price by clicking the "Edit" button.
- Remove a custom price by clicking the "Delete" button.
- Clear all custom prices by clicking the "Clear" button.
Manage Multi-store
Learn how to manage multiple stores in Laundry Grow.
Add Store
To add a new store, follow the steps below:
- In the navbar, click on the "Add Store" button. You will be redirected to the Add New Store form page.
- Fill out the form with the required store details and select a plan.
- Click on the "Make Payment and Save" button. You will be redirected to the payment gateway.
- Choose your preferred payment method and complete the payment.
- After a successful payment, your store will be added successfully and visible in your store list.
Rack Management
Manage your racks easily on Laundry Grow. See guides for Rack Setup, Rack Updates, and Rack Tracking.
Add New Rack
To add a new rack, follow the steps below:
- Go to the Rack Allocation section. Here, you will see a visual list of all existing racks.
- Click on the "Add New" button. A popup form will appear.
- In the form, enter the rack name (e.g., R1-A), specify the number of shelves, and select the location.
- Click on the "Add Rack" button to save.
- The new rack will be successfully added and visible in the rack list.
Update Rack
To update an existing rack, follow the steps below:
- Go to the Rack Allocation section. Here, you will see a visual list of all existing racks.
- At the top-right corner of the rack, click on the Settings icon. A popup form will appear with the rack’s current details.
- Make the necessary changes (e.g., rack name, number of shelves, or location).
- Click on the "Save Changes" button.
- The rack will be successfully updated, and the changes will be reflected in the rack list.
Rack Tracking
To track orders in a rack, follow the steps below:
- Go to the Rack Allocation section. Here, you will see a visual list of all existing racks.
- Each rack is displayed with multiple shelves for better organization.
- Click on a specific shelf to view the orders stored in it.
- A popup will appear showing the details of that shelf, including the number of orders assigned.
- The popup will also display a table listing all the orders stored in that shelf.
- In the Action column of the table, you will see an Eye icon next to each order.
- Click on the Eye icon to directly open and view the complete order details.
Financial Accounts
How to manage financial accounts on Laundry Grow. Learn more about Voucher Entry, Creating a Head, and Adding a Supplier.
Voucher Entry
To record a voucher, follow the steps below:
- Go to the Voucher section. By default, the Add Voucher tab will be active.
- On the right-hand side, you will see the Voucher Entry Form with the following fields:
- Type – Select the voucher type (Purchase, Receipt, Sales, Payment, Journal, or Contra).
- Date – Enter the transaction date.
- Debit Sub Head – Automatically populated based on voucher type; choose the appropriate option.
- Credit Sub Head – Automatically populated based on voucher type; choose the appropriate option.
- Amount – Enter the transaction amount.
- Narration (Optional) – Add remarks or notes for the voucher, if required.
- After filling in the form, click on the Save button.
- Your voucher will be saved successfully.
Day Book
To view and manage transactions in the Day Book, follow the steps below:
- Go to the Voucher section.
- Click on the Day Book tab.
- On the right-hand side, a list of all transactions will appear.
- Review the transactions to track entries easily.
- If needed, click on the Edit button beside a transaction to update it.
Manage Account Heads
In this section, you can create and manage account heads for your financial transactions. Account heads help organize your accounting structure into categories such as Purchase, Sales, Payment, Receipts, and more.
Main Head List
To view and manage account heads, follow the steps below:
- Go to the Manage Head section. By default, the Main Head List tab will be active.
- Here, you can view all the existing main heads in the system.
- Note that you cannot add or edit main heads directly from this section. They are predefined and used as the base structure for your accounting system.
Create New Sub-Head
To create and manage sub-heads, follow the steps below:
- Go to the Manage Head section and click on the Add New Sub-Head tab.
- On the right side, a form will appear. First, select the Main Head from the dropdown list.
- Enter the name of the new sub-head in the input field.
- Click on the Save button. The new sub-head will be saved successfully.
- Once saved, the sub-head list will be displayed below the form.
- In the list, you can use the Edit action button to update the sub-head details if needed. Note: Some sub-heads are provided by default and cannot be edited. Only user-added sub-heads are editable.
Default Bank Setup
To create and manage default banks, follow the steps below:
- Go to the Manage Head section and click on the Default Bank Setup tab.
- On the right side, a list of all banks will appear. You can see which bank is already set as default in the Action column.
- If you want to change the default bank, click on the Make Default button. A confirmation popup will appear asking, "Are you sure you want to set this bank as default?"
- Click Yes, Set Default to confirm. You will then see a success message indicating that the default bank has been updated.
Supplier
Manage and track all your suppliers effortlessly using Laundry Grow. Stay organized and keep supplier information up to date.
Add New Supplier
To create and manage suppliers, follow the steps below:
- Go to the Supplier section. By default, the Add Supplier tab will be active.
- On the right-hand side, you will see the Add New Supplier form with the following fields: Supplier Name, Phone, Email, and Address. (Supplier Name is mandatory.)
- Fill in the form and click on the Save button. The supplier will be added successfully.
Supplier List
To view and manage suppliers, follow the steps below:
- Go to the Supplier section and click on the Supplier List tab.
- On the right-hand side, you will see the list of all suppliers.
- To update a supplier, click on the Edit button next to the respective supplier.
General Reports
How to Generate and Order and payment history reports in Laundry Grow.
Order Report
To view and filter order reports, follow these steps:
- Go to the General Report section. By default, the Order Report tab is active.
- Use the available filters to refine your report:
- Number of Rows – choose how many rows to display.
- Customer – search or select a customer.
- From–To Date – set the date range for the report.
- Order Status – filter by the current status of orders.
- Payment Type – filter by mode of payment.
- Awaiting Refund – view orders pending a refund.
- Overdue Orders – view orders that are overdue.
- Click the Search button to generate the report.
- Customize the report table columns:
- Remove a column by clicking the X icon beside its name.
- Restore all columns by clicking the Reset Columns button.
Payment History
To view and filter payment history, follow these steps:
- Go to the General Report section and click on the Payment Report tab.
- Use the available filters to refine your results:
- Number of Rows – choose how many rows to display.
- Search Reference ID – enter a reference ID to quickly find a specific payment.
- Customer – type or select a customer to view related payments.
- From Date – select the start date (dd-mm-yyyy).
- To Date – select the end date (dd-mm-yyyy).
- Payment Mode – filter payments by mode (Cash, Card, UPI, Bank, etc.).
- Click the Search button to generate and display the results.
- Customize the report table columns:
- Remove a column by clicking the X icon next to its name.
- Restore all columns by clicking the Reset Columns button.
Financial Reports
Learn how to generate essential financial reports in Laundry Grow, including Ledger, Cash Flow, Profit & Loss, and Balance Sheet.
Order Report
To view and filter order reports (Ledger), follow these steps:
- Go to the Financial Report section. By default, the Ledger tab is active.
- From the filter section:
- Select a Head from the Account Head field (required to generate the ledger).
- Optionally, apply additional filters such as:
- Number of Rows – choose how many rows to display.
- From–To Date – set the date range for the ledger data.
- Click the Search button to generate the ledger report.
Cash Flow Report
To view and filter cash flow reports, follow these steps:
- Go to the Financial Report section and click on the Cash Flow tab.
- From the filter section:
- Select a Cash Flow Head (if required).
- Optionally, apply additional filters:
- Number of Rows – choose how many rows to display.
- From–To Date – set the date range for the report.
- Click the Search button to generate the report.
Profit & Loss Report
To view and filter profit & loss reports, follow these steps:
- Go to the Financial Report section and click on the Profit & Loss tab.
- From the filter section:
- If you have multiple stores, you can generate the report for all stores.
- Optionally, apply additional filters:
- From–To Date – select the date range for the report.
- Click the Search button to generate the report.
Balance Sheet Report
To view and filter balance sheet reports, follow these steps:
- Go to the Financial Report section and click on the Balance Sheet tab.
- From the filter section:
- If you have multiple stores, you can generate the report for all stores.
- Optionally, apply additional filters:
- Number of Rows – choose how many rows to display.
- From–To Date – select the date range for the report.
- Click the Search button to generate the report.
User Management
Manage users in Laundry Grow. Learn how to change passwords, update user details, search for users, Create a User, and Set User Roles.
Add User
To add a new user, follow these steps:
- Go to the Add User section. You will be redirected to the Add User page.
- On the left side, fill out the form with the following details:
- Full Name
- WhatsApp Number
- User Role – select either Manager or Assistant
- Click the Save button. The user will be added successfully and will appear in the user list on the right side of the page.
Update User Role
To update the role of an existing user, follow these steps:
- Go to the Add User section. You will see the list of users on the right side.
- In the Role column, click the Edit icon for the user whose role you want to change.
- A pop-up will appear. Select the desired role and click Update. The user's role will be updated successfully.
Change User Password
To update the password of an existing user, follow these steps:
- Go to the Add User section. You will see the list of users on the right side.
- In the Change Password column, click the Key icon for the user whose password you want to change.
- A pop-up will appear. Enter the new password and click the Update Password button. The password will be updated successfully.
Change User Status
To activate or deactivate a user, follow these steps:
- Go to the Add User section. You will see the list of users on the right side.
- In the Active/Inactive column, click the status icon:
- If the user is active, click the Trash icon to deactivate.
- If the user is inactive, click the Recycle icon to activate.
- A confirmation pop-up will appear:
- Click Yes, Change to confirm. The user's status will be updated.
- When deactivated, the row will turn red and the icon will change to Recycle. When activated, the row will return to normal and the icon will change back to Trash.
Update User Details
To update the details of an existing user, follow these steps:
- Go to the Add User section. You will see the list of users on the right side.
- In the Action column, click the Edit icon for the user whose details you want to update.
- A pop-up will appear with a form containing the existing user data. Make the necessary changes and click the Save Changes button. The user details will be updated successfully.
Search User
To search for a specific user, follow these steps:
- Go to the Add User section. You will see the list of users on the right side.
- In the top-right corner of the user list, you will find a search bar. Type the name of the user you want to find and click the Search icon. The matching user will be displayed in the list.
System Settings
Configure and manage system settings in Laundry Grow. Refer to General Settings, Tax Settings, POS Settings, Service Settings, and more.
General Settings
To view or update general settings, follow these steps:
- Go to the Settings section. You will be redirected to the Settings page.
- By default, the General Settings tab on the left side will be active.
- On the right side, you will see a form with the existing data:
- Full Name
- Company
- Phone Number
- Company Address
- Country
- Currency
- Language
- Time Zone
- Logo Upload – you can upload or change the company logo
- Make any desired changes, then click the Save button to update the settings.
Security Settings
To update your password or security settings, follow these steps:
- Go to the Settings section. You will be redirected to the Settings page.
- Click on the Security Settings tab.
- On the right side, you will see a form with the following fields:
- Current Password
- New Password
- Confirm Password
- Enter the required information and click the Change Password button to update your password successfully.
Screen Lock Settings
To set up or update screen lock on your system, follow these steps:
- Go to the Settings section. You will be redirected to the Settings page.
- Click on the Screen Lock Settings tab.
- On the right side, you will see the Screen Lock setup:
- To activate screen lock, turn on the toggle button. Enter a 4-digit PIN and click the Change PIN button to set a new PIN.
- If a PIN is already set, enter the current PIN, then enter the new PIN and click Change PIN.
- To deactivate screen lock, turn off the toggle button. You will be asked to enter the current PIN, then click Change PIN to confirm.
- You can also show or hide the PIN while typing using the Show/Hide button.
Tax Settings
To configure tax settings in your system, follow these steps:
- Go to the Settings section. You will be redirected to the Settings page.
- Click on the Tax Settings tab.
- On the right side, you will see the tax settings:
- To apply tax in your system, turn on the toggle button.
- Enter the following details:
- Tax Rate
- Tax Type
- Tax ID (optional)
- Click the Save button to apply the settings.
- To disable tax, turn off the toggle button. The system will no longer apply tax.
POS Settings
To configure POS settings in your system, follow these steps:
- Go to the Settings section. You will be redirected to the Settings page.
- Click on the POS Settings tab.
- On the right side, you will see the POS settings:
- Custom UPI QR Code – To enable, turn on the toggle button. Two input fields will appear:
- UPI ID
- UPI Name
- Default Printer – Select a default printer from the dropdown menu.
- Default Delivery Charge – Enter the default delivery charge for orders.
- After making all changes, click the Save button to apply the settings.
- Custom UPI QR Code – To enable, turn on the toggle button. Two input fields will appear:
Service Settings
The Service Settings allow you to manage categories and items for your services. Follow the steps below:
- Go to the Settings section. You will be redirected to the Settings page.
- Click on the Service Settings tab.
- On the right side, you will find three main sections: Master Category, Washing Category, and Items.
1. Master Category
- The Master Category table displays all existing master categories.
- To add a new master category, click the Add New button located at the top-right of the table.
2. Washing Category
- The Washing Category table shows the available washing categories.
- To add a new washing category, click the Add New button at the top-right of the table.
- Each row includes a Select column with checkboxes. Selecting a category will display the related items below.
3. Items
- Items are listed according to their assigned categories.
- You can toggle an item Active/Inactive using the switch in the items list.
- To add a new item:
- Click the New Item button.
- A popup form will appear where you must enter:
- Main Category
- Washing Category
- Item Name
- Item Price
- Upload Image
- Click Save to add the item successfully.
- To edit an existing item:
- Click the Edit Item button for the desired item.
- A popup will appear showing the item’s name and price (only the price is editable).
- Update the price and click Save. The changes will be applied successfully.
- Items can also be sorted category-wise for easier management.
2-Factor Authentication Settings
To enable and configure 2-Factor Authentication (2FA) in your system, follow these steps:
- Go to the Settings section. You will be redirected to the Settings page.
- Click on the 2-FA Setup Settings tab.
- On the right side, you will see the 2-Factor Authentication settings.
- Download and install the Google Authenticator app:
- Open the app, tap on Add a Code, and then select Scan a QR Code.
- Scan the QR code displayed on your system screen. Your Laundry Grow account will now be added to the Google Authenticator app.
- You will see a 6-digit code in the app that refreshes every few seconds. This is your authentication code.
- Enter the authentication code into your system and click on Verify.
- If the code is correct, 2-Factor Authentication will be successfully enabled for your account.
- To disable 2FA at any time, use the Toggle button available in the same settings section.
Store Opening/Closing Settings
To configure Store Opening and Closing timings in your system, follow these steps:
- Go to the Settings section. You will be redirected to the Settings page.
- Click on the Store Opening/Closing Setup tab.
-
On the right side, you will see the Store Opening/Closing Setup settings:
- Use the Toggle button at the top-right corner to enable or disable store timings.
- Adjust the Opening and Closing timings for both Manager and Assistant.
- Once the timings are set, click on the Save Timings button to update and save your store schedule.
Multi-Store Settings
To view and manage your stores, follow these steps:
- Go to the Settings section. You will be redirected to the Settings page.
- Click on the My Stores tab.
-
On the right side, you will see the My Stores list displayed in a table format:
- You can view all your stores along with their current status.
- The store marked as Primary Store will not have any action buttons.
- For other stores, you will see a Set Primary button in the Action column.
- Clicking on Set Primary will ask for confirmation. Once confirmed, the selected store will become your new Primary Store.
Social & Feedback Settings
To configure social and feedback links in your system, follow these steps:
- Go to the Settings section. You will be redirected to the Settings page.
- Click on the Social & Feedback Settings tab.
-
On the right side, you will see the Social & Feedback Settings form:
- You can enter links for feedback platforms such as Trustpilot, Google, and Facebook.
- You can also add your social media links such as Instagram and Facebook.
- If you want to add more platform links, click on the Add More button.
- When adding a new platform, enter the Platform Name and the Link.
- After entering all details, click on the Save Links button to save your changes.
Login Activity
To view your system’s login activity, follow these steps:
- Go to the Settings section. You will be redirected to the Settings page.
- Click on the Login Activity tab.
-
On the right side, you will see the Login Activity details:
- A list of recent login activities will be displayed.
- Each record shows the Date & Time, User Role, and User Details.
- If needed, click on the Print button to print the login details.